


DIY Sticker Book for Happy Planner™ Stickers!
If you are a member of our Happy Planning™ Instagram community, then you might have seen a few different planner babes create their own Sticker Book to house their ever-growing collection of me & my BIG ideas stickers. With the ability to punch pages using The Happy Planner™ Punch and swap out to larger Expander Discs when needed, The Happy Planner™ system makes it all possible!
Today we are happy to share that we now have one of these popular DIY Sticker Books on our blog, along with step-by-step instructions, thanks to the work of mambi Design Team member Jennie McGarvey.

About this project, Jennie writes:
"Last fall I realized I needed something to wrangle all of my sticker books and make it easier for me to keep them together and see them all. Then, I got the awesome Happy Planner™ Storage Case and I put my stickers right in one of the pockets and it was fantastic. However, they kept multiplying (a great problem!) and I really needed to implement my old idea."

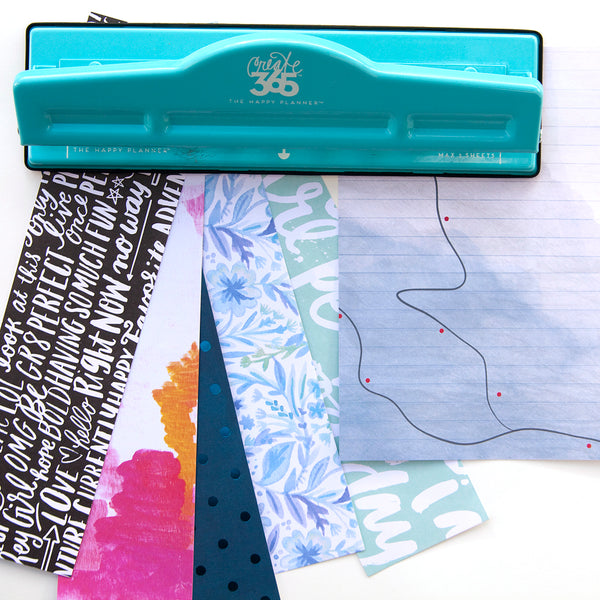
Jennie's Step by Step Directions:
- I chose several me & my BIG ideas patterned papers.
- I trimmed my patterned papers to 9"x5.5"
- Once I had all my sheets, I punched them with the Happy Planner™ Punch.
- I took out each sticker page from it's packaging and adhered them to the backs of the papers I had punched.
- Once each sheet was adhered to a sheet of patterned paper, I then put the pages on discs, using Happy Planner™ dashboards as dividers for different sections.
- I used both Happy Planner™ dashboards as covers and other covers that I wasn't using on my Happy Planners, as well.


Catch us living creatively on Instagram at:
@meandmybigideas + @the_happy_planner!
We're also on Periscope & Snapchat as meandmybigideas.

Leave a comment